-CHUẨN BỊ:
Máy tính
Bộ công cụ biên dịch apk : đây
Notepad++ hoặc Edit Pad Pro:GoogleSearch
Mở commandprompt.bat cài framework-res.apk trước bằng lệnh apktool if framework-res.apk framework-res lấy từ ROM của bạn.
1. Center Clock:

Trích xuất và decompile SystemUI.apk từ ROM của bạn
B1: Đi đến smali\com\android\systemui\statusbar\phone
Mở PhoneStatusBar.smali tìm dòng sau
Code: .field private static final IS_CU:Z = true
Đổi thành
Code: .field private static final IS_CU:Z = false
B2: Đi đến res\layout\zzz_status_bar_gemini.xml
Tìm
<com.android.systemui.statusbar.policy.Clock ……/>
Xóa nó
Copy code sau
Code:
<LinearLayout android:gravity="center" android:orientation="horizontal" android:id="@id/clock" android:layout_width="fill_parent" android:layout_height="fill_parent">
<com.android.systemui.statusbar.policy.Clock android:textAppearance="@style/TextAppearance.StatusBar.Clock" android:gravity="center" android:id="@id/clock" android:paddingLeft="6.0dip" android:layout_width="wrap_content" android:layout_height="fill_parent" android:singleLine="true" />
</LinearLayout>
Tìm:
<LinearLayout android:eek:rientation="horizontal" android:id="@id/ticker" android:paddingLeft="6.0dip" android:animationCache="false" android:layout_width="fill_parent" android:layout_height="fill_parent">
Thêm cái này vào trong đó
Tạo 1 file ảnh có tên ticker_background.png màu đen hoàn toàn (cỡ 1x1 cũng đc) đặt vào res/drawable-hdpi
B3: Recompile và sign apk vừa có
Đặt vào máy set perm rw-r-r sau đó reboot hoặc tạo flash.zip cho tiện
Xong, tận hưởng thành quả!
2. Tạo Clock và transparent tuỳ chỉnhTrích xuất các tập tin sau đây từ ROM
SystemUI.apk
Settings.apk
B1: Chỉnh sửa Settings.apk
Decompile Settings.apk
Đi đến \res\xml\settings_header.xml
Tìm:
<header android:icon="@drawable/ic_settings_display" android:id="@id/display_settings" android:title="@string/display_settings" android:fragment="com.android.settings.DisplaySettings" />
Thêm dòng này xuống dưới nó
Code:
Code:
<header android:icon="@drawable/control_toggles" android:title="@string/sb_prefs_title">
<intent android:targetPackage="com.android.settings" android:targetClass="com.android.settings.Statusbar" />
</header>
Thêm dòng sau vào cuối
Code:
<string name="sb_prefs_title">Statusbar Preferences</string>
<string name="clock_show_title">Clock Position (Reboot Required)</string>
<string name="clock_show_summ_on">Statusbar clock Center</string>
<string name="clock_show_summ_off">Statusbar clock Right</string>
<string name="sb_transparency_title">Statusbar transparency (Reboot Required)</string
<string name="sb_transparency_no">No transparency</string>
<string name="sb_transparency_full">Full transparency</string>
Thêm dòng sau dưới nó:
Code:
<array name="sb_transparency_entries">
<item>@string/sb_transparency_no</item>
<item>10 percent</item>
<item>20 percent</item>
<item>30 percent</item>
<item>40 percent</item>
<item>50 percent</item>
<item>60 percent</item>
<item>70 percent</item>
<item>80 percent</item>
<item>90 percent</item>
<item>@string/sb_transparency_full</item>
</array>
<string-array name="sb_transparency_values">
<item>255</item>
<item>229</item>
<item>204</item>
<item>178</item>
<item>153</item>
<item>127</item>
<item>102</item>
<item>76</item>
<item>51</item>
<item>25</item>
<item>0</item>
</string-array>
Tìm
<activity android:label="@string/device_status_activity_title" android:name=".deviceinfo.SdCardUpgrade">
<intent-filter>
<action android:name="android.intent.action.MAIN" />
<category android:name="android.intent.category.DEFAULT" />
Quảng cáo
<category android:name="android.intent.category.VOICE_LAUNCH" />
</intent-filter>
</activity>
Thêm dưới nó:
Code:
<activity android:label="@string/sb_prefs_title" android:name=".Statusbar">
<intent-filter>
<action android:name="android.intent.action.MAIN" />
</intent-filter>
</activity>
Đóng gói và sign lại Settings.apk
B2: Chỉnh sửa SystemUI.apk
Decompile SystemUI.apk
Đi đến \smali\com\android\systemui\statusbar\phone\PhoneStatusBar.smali
Quảng cáo
Tìm:
.line 452
const-string v13, "android.intent.action.SKIN_CHANGED"
invoke-virtual {v4, v13}, Landroid/content/IntentFilter;->addAction(Ljava/lang/String;)V
Thêm đoạn này vào dưới:
.line 473
move-object/from16 v0, p0
iget-object v13, v0, Lcom/android/systemui/statusbar/phone/PhoneStatusBar;->mMediaEjectBroadcastReceiver:Landroid/content/BroadcastReceiver;
invoke-virtual {v2, v13, v6}, Landroid/content/Context;->registerReceiver(Landroid/content/BroadcastReceiver;Landroid/content/IntentFilter;)Landroid/content/Intent;
(phía trên .method onBarViewAttached()V )
Thêm dòng sau dưới nó:
Thêm trên nó
Chú ý 2 mã màu đỏ
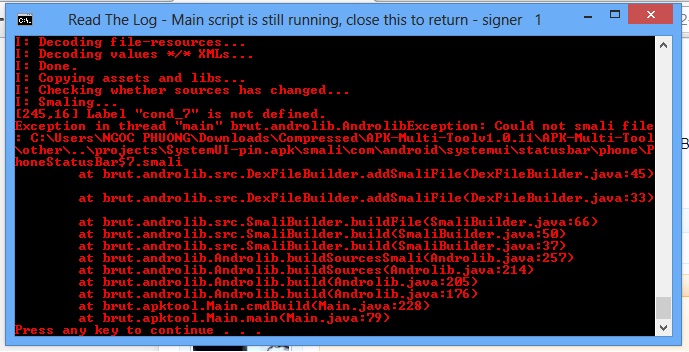
Đi đến \smali\com\android\systemui\statusbar\phone\PhoneStatusBar$7.smali
Tìm:
.line 2436
iget-object v7, p0, Lcom/android/systemui/statusbar/phone/PhoneStatusBar$7;->this$0:Lcom/android/systemui/statusbar/phone/PhoneStatusBar;
iget-object v7, v7, Lcom/android/systemui/statusbar/phone/PhoneStatusBar;->mToolBarView:Lcom/android/systemui/statusbar/toolbar/ToolBarView;
invoke-virtual {v7}, Lcom/android/systemui/statusbar/toolbar/ToolBarView;->moveToCurrentScreen()V
goto :goto_0
Thêm dòng sau dưới nó
:cond_5
Và if-eqz v6, :cond_6
Phải liên tiếp với nhau
(Bước này khốn nạn nhất là bạn phải chỉnh sửa lại toàn bộ cond của chúng theo thứ tự
cond_5 cond_6 cond_7 cond_8 cond_9 cond_a cond_b cond_c…..trong PhoneStatusBar$7.smali, nếu k sẽ gặp lỗi khi recompile, yêu cầu tập trung cao độ 😁)
Đi đến \res\layout\zzz_status_bar_gemini.xml
Tìm:(dòng thứ 3 trên xuống):
xmlns:systemui="http://schemas.android.com/apk/res/com.android.systemui">
Thêm dòng này sau nó:
Thêm cái này vào cuối
<item type="id" name="center_clock">false</item>
Tải file này về giải nén chép đè lên SystemUI đang làm
Recompile và sign lại SystemUI.apk
Tiếp tục Decompile cái vừa Recompile
Tìm đến 2 mã màu đỏ phía trên (PhoneStatusBar.smali)
thay bằng các mã có trong public.xml của bạn
Cụ thể:
0x7f0e002b thay bằng <public type="id" name="clock" id="0x7fxxxxxx" />
0x7f0e00d7 thay bằng <public type="id" name="center_clock" id="0x7fxxxxxx" />
Sau đó lại Recompile và sign SystemUI.apk
B3: Copy 2 file trên vào \system\app
Set perm rw-r-r và reboot tận hưởng thành quả :D
3. Thêm speed meter lên statusbar

Down file này về giải nén ra thư mục riêng
Decompile SystemUI.apk
B1: Đi đến res\layout\zzz_status_bar_gemini.xml
Tìm:
<LinearLayout android:eek:rientation="horizontal" android:layout_width="0.0dip" android:layout_height="fill_parent" android:layout_weight="1.0">
Thêm dòng sau dưới nó
B2: Chép toàn bộ file trong thư mục vừa giải nén vào \smali\
B3: Giống B3 trên :D
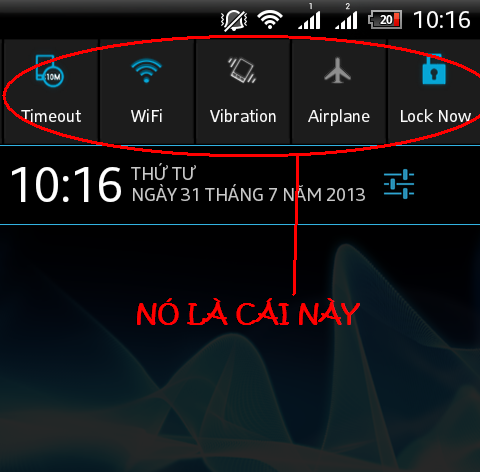
4. Thêm Lidroid Toggle cho statusbar (thay cho 13 toggle gốc)
B1: Decompile SystemUI.apk
Đi đến res/values/ids.xml
Thêm vào cuối
Đến res/values/strings.xml
Thêm vào cuối
Đến res/layout/status_bar_expanded.xml
Thêm dòng màu đỏ
Đến smali/com/android/systemui/statusbar/phone/PhoneStatusBar.smali
Tìm:.field mPostCollapseCleanup:Ljava/lang/Runnable;
Thêm dòng sau dưới nó
Tìm:
.method public addIcon(Ljava/lang/String;IILcom/android/internal/statusbar/StatusBarIcon;)V
Kéo xuống và thêm mã giống như sau
Chú ý các mã màu đỏ, khi biên dịch gặp lỗi thì sửa p0 thành v0
Tìm:.method protected makeStatusBarView()Landroid/view/View;
Kéo xuống và thêm mã như sau
Ở mỗi máy khác nhau các mã sẽ khác nhau, phải đảm bảo các mã màu đỏ đều giống nhau như trên
khi biên dịch gặp lỗi thì sửa p0 thành v0
Chú ý mã: 0x7f0e0096
Tiếp tục kéo xuống dưới
Thêm như sau
Đến đây thì recompile lại SystemUI.apk sau đó lại decompile (mục đích là để thêm hex code mới vào public.xml)
Mở smali/com/android/systemui/statusbar/phone/PhoneStatusBar.smali tìm đến đoạn mã0x7f0e0096 thay bằng đoạn mã
<public type="id" name="adi_quickpanel" id="0x7fxxxxxx" />
nằm trong public.xml
B2: Khớp code
-Decompile file này source_ICS_Lidroid_SytemUI.apk sau đó copy toàn bộ những gì extract đc sang thư mục decompile của SystemUI.apk đang build..
-Tiếp tục recompile (systemui đang làm) và decompile file .apk vừa recom xong (thêm hex code mới )
-Tải file này về ICS_Lidroid_public.xml mở ra để đấy
Mở tiếp public.xml trong thư mục decompile của SystemUI.apk
Tìm tới đây smali/com/lidroid/systemui/quickpanel/[đây]sẽ thấy 1 đống smali
Mở từng smali ra đc tìm các đoạn mã bắt đầu bằng 0x7fxxxxxx so sánh với ICS_Lidroid_public.xml để tìm code hex dạng <public type="blah" name="quickpanel_airplane_text" id="0x7fxxxxxx" />
Thay thế nó bằng code trong public.xml của bạn…. (Chỗ này khó hiểu vl J)
Ví dụ
Mở AirplaneButton.smali
Tìm const v0, 0x7f080089
Tìm tiếp 0x7f080089 trong ICS_Lidroid_public.xml
Dư lày <public type="string" name="quickpanel_airplane_text" id="0x7f080089" />
Rồi tìm đúng cái như thế trong Public.xml (khác hex màu đỏ nhé) và thay cmn cái mã vàoAirplaneButton.smali
Ai xong bước này còn kiên nhẫn thì cứ làm cho đến hết nhé! :p
Xong xuôi đóng gói lại, tải file QuickPanel_Settings.apkvề rồi copy hết vào /system/app là ok
p/s: Mà thế đ' nào TinhTe không ẩn đc mấy cái emoticons nhỉ?
Các bạn cho mình thêm ý kiến hoàn thiện bài viết nhé!!
Hãy Like nếu bài viết này hữu ích! ;)